
Start here
Control Center
The panel at the top right for the things you change every day: Wi-Fi, Bluetooth, Focus, Dark Mode, brightness, sound, music and quick switches.
On this page
- What it is
- Why WolOS does it this way
- How
- Open and close it
- What each part does
- Join a Wi-Fi network
- Choose where sound plays
- Brightness, Night Shift and a second screen
- Quiet for a while: Focus
- Pair a Bluetooth device
- Choose what Control Center shows
- The same switches on the keyboard
- A worked example
- If something goes wrong
What it is
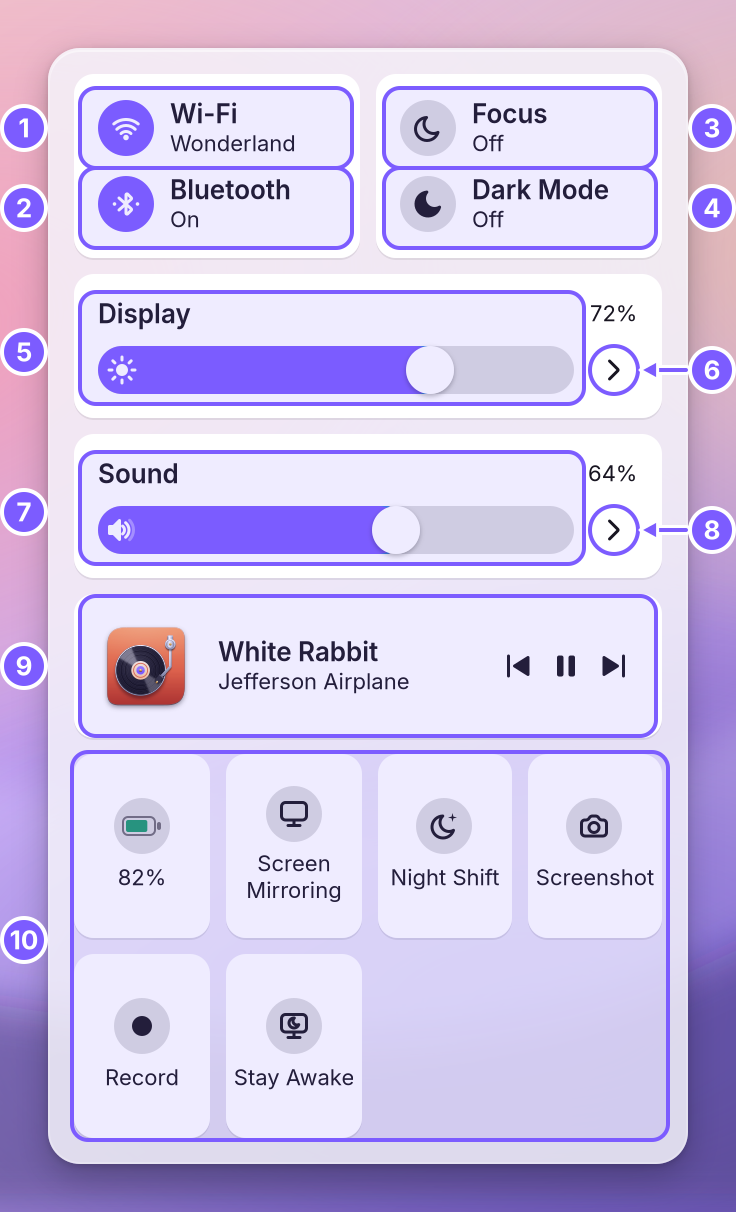
The panel behind the icon at the top right of the menu bar: Wi-Fi, Bluetooth, Focus, brightness, sound and quick switches. is the panel that opens from the icon with four small squares near the right end of the . It holds the switches you reach for many times a day, so you do not have to open System Settings for them: the network, Bluetooth, Do Not Disturb, Dark Mode, the brightness of the screen, the volume, the music that is playing, and a grid of A square button in Control Center that turns one thing on or off, such as Dark Mode or Stay Awake..
Why WolOS does it this way
Small changes should take one click, like the light switches by the door. Everything in Control Center is also in System Settings with all its options; Control Center has only the part you change often. It opens at once and closes with Escape or a click anywhere else.
How
Open and close it
Click the Control Center icon in the menu bar. Press Escape or click the icon again to close it.
What each part does
The numbers match the picture above.
- Wi-Fi shows the network you are on. Click the round icon to turn Wi-Fi on or off (this may ask for an administrator's password); click the name for the list of networks.
- Bluetooth shows whether it is on. Click the icon to turn it on or off; click the name for your paired A short-range radio for wireless headphones, mice, keyboards and phones. devices.
- Focus keeps notification banners quiet; click it to choose for how long. See below.
- Dark Mode switches the whole desktop and your apps between light and dark. See Dark Mode.
- Display: drag the slider to make the screen brighter or darker.
- The arrow at the end of the Display slider opens the Display page: Night Shift, Screen Mirroring and the keyboard light.
- Sound: drag the slider for the volume. The number above it is the volume in percent; 100% is the speaker's normal full level.
- The arrow at the end of the Sound slider opens the Sound page, where you choose the speakers, headphones and microphone.
- Now Playing shows the song or video that is playing, in any app, with buttons for back, play or pause, and next.
- The tiles, one switch each: the battery (with its charge), Screen Mirroring, Night Shift, Screenshot, Record (the screen as a video), and Stay Awake. Click a tile to switch it; a tile that is on is filled with the The one colour WolOS uses for what is selected or switched on: buttons, switches, highlights. You pick it in Settings > Appearance..
Join a Wi-Fi network
Click the name next to Wi-Fi (1). The Networks page lists the network you are on (with Connected) and those nearby; a lock means it needs a password.
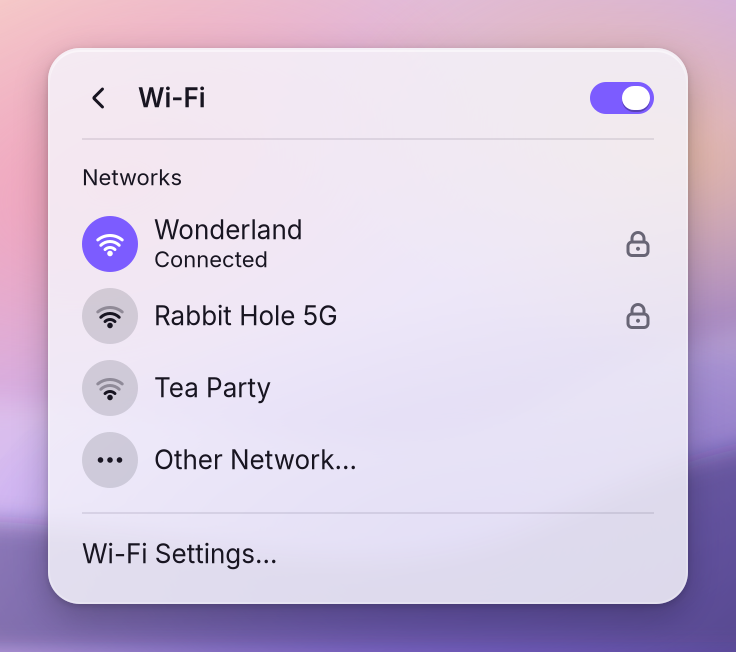
- Click a network. If it has a lock, you see "Join “…”" with a Password field.
- Type the password and click Join.
- For a network that hides its name, click Other Network…, type its Network name and password, and click Join.
Wi-Fi Settings… at the bottom opens System Settings > Wi-Fi, where you can forget a network.
Choose where sound plays
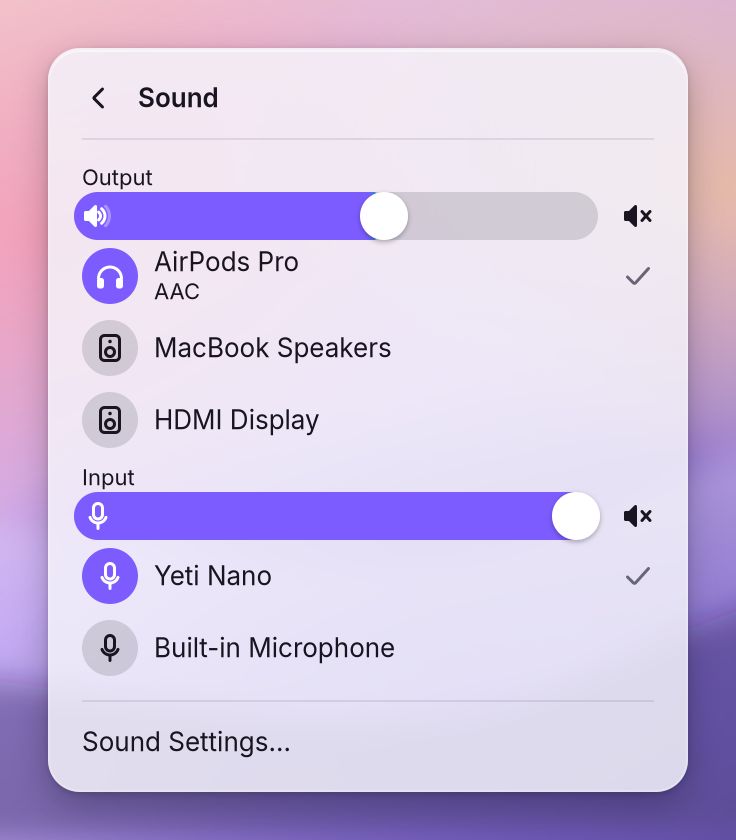
Click the arrow at the end of the Sound slider (8). The page lists Output (speakers, headphones, a TV) and Input (microphones), each with its own slider and mute button. Click a device to use it; the tick moves. Wireless headphones show the way their sound is sent (the The way sound or video is packed into a file or sent to a device. A player needs the right codec to play a file.) under their name.
Brightness, Night Shift and a second screen
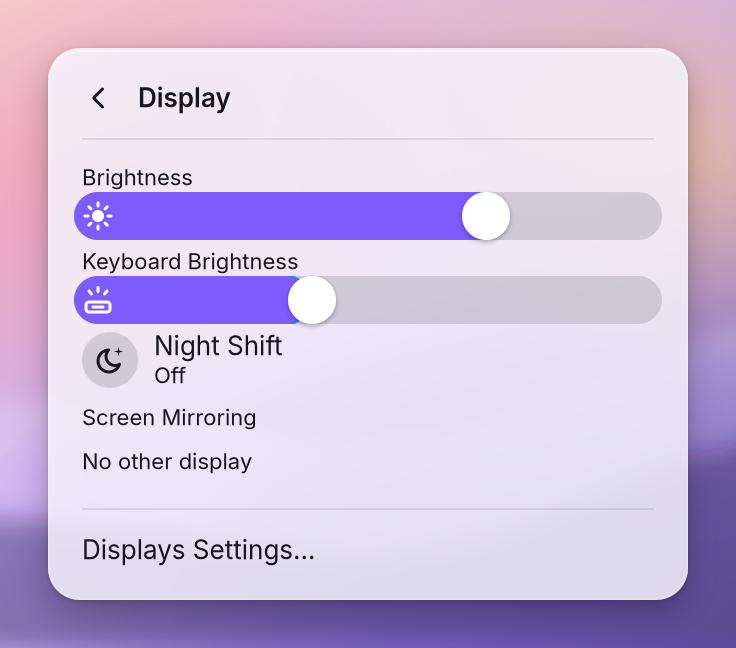
Click the arrow at the end of the Display slider (6). The page has Brightness, Keyboard Brightness (on laptops with a lit keyboard), Night Shift and Screen Mirroring. Screen Mirroring shows the same picture on a second screen or projector; with only one screen connected it says "No other display".
Quiet for a while: Focus
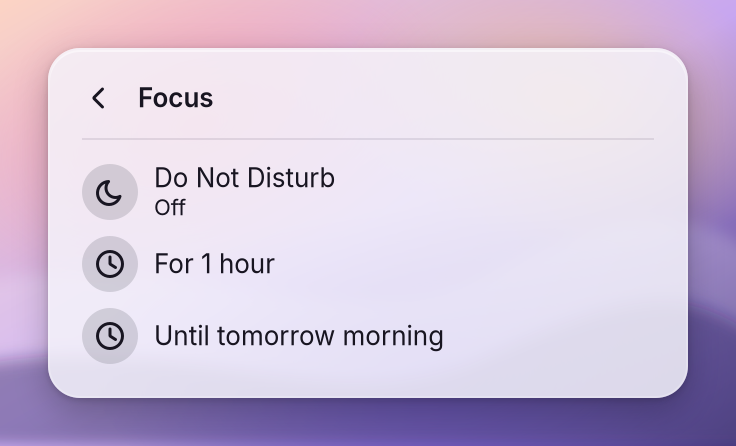
Click Focus (3). Choose Do Not Disturb and how long: For 1 hour or Until tomorrow morning. While it is on, banners stay away and wait in The list of notifications you have not cleared yet. Click the clock in the menu bar to open it.; a moon appears in the menu bar. Click Off to end it early. See Notifications.
Pair a Bluetooth device
Click the name next to Bluetooth (2) for Devices: the devices you paired before, with Connected next to the one in use. Click one to connect it. To pair a new one, put it in pairing mode (see its manual) and open System Settings > Bluetooth. See Sharing and devices.
Choose what Control Center shows
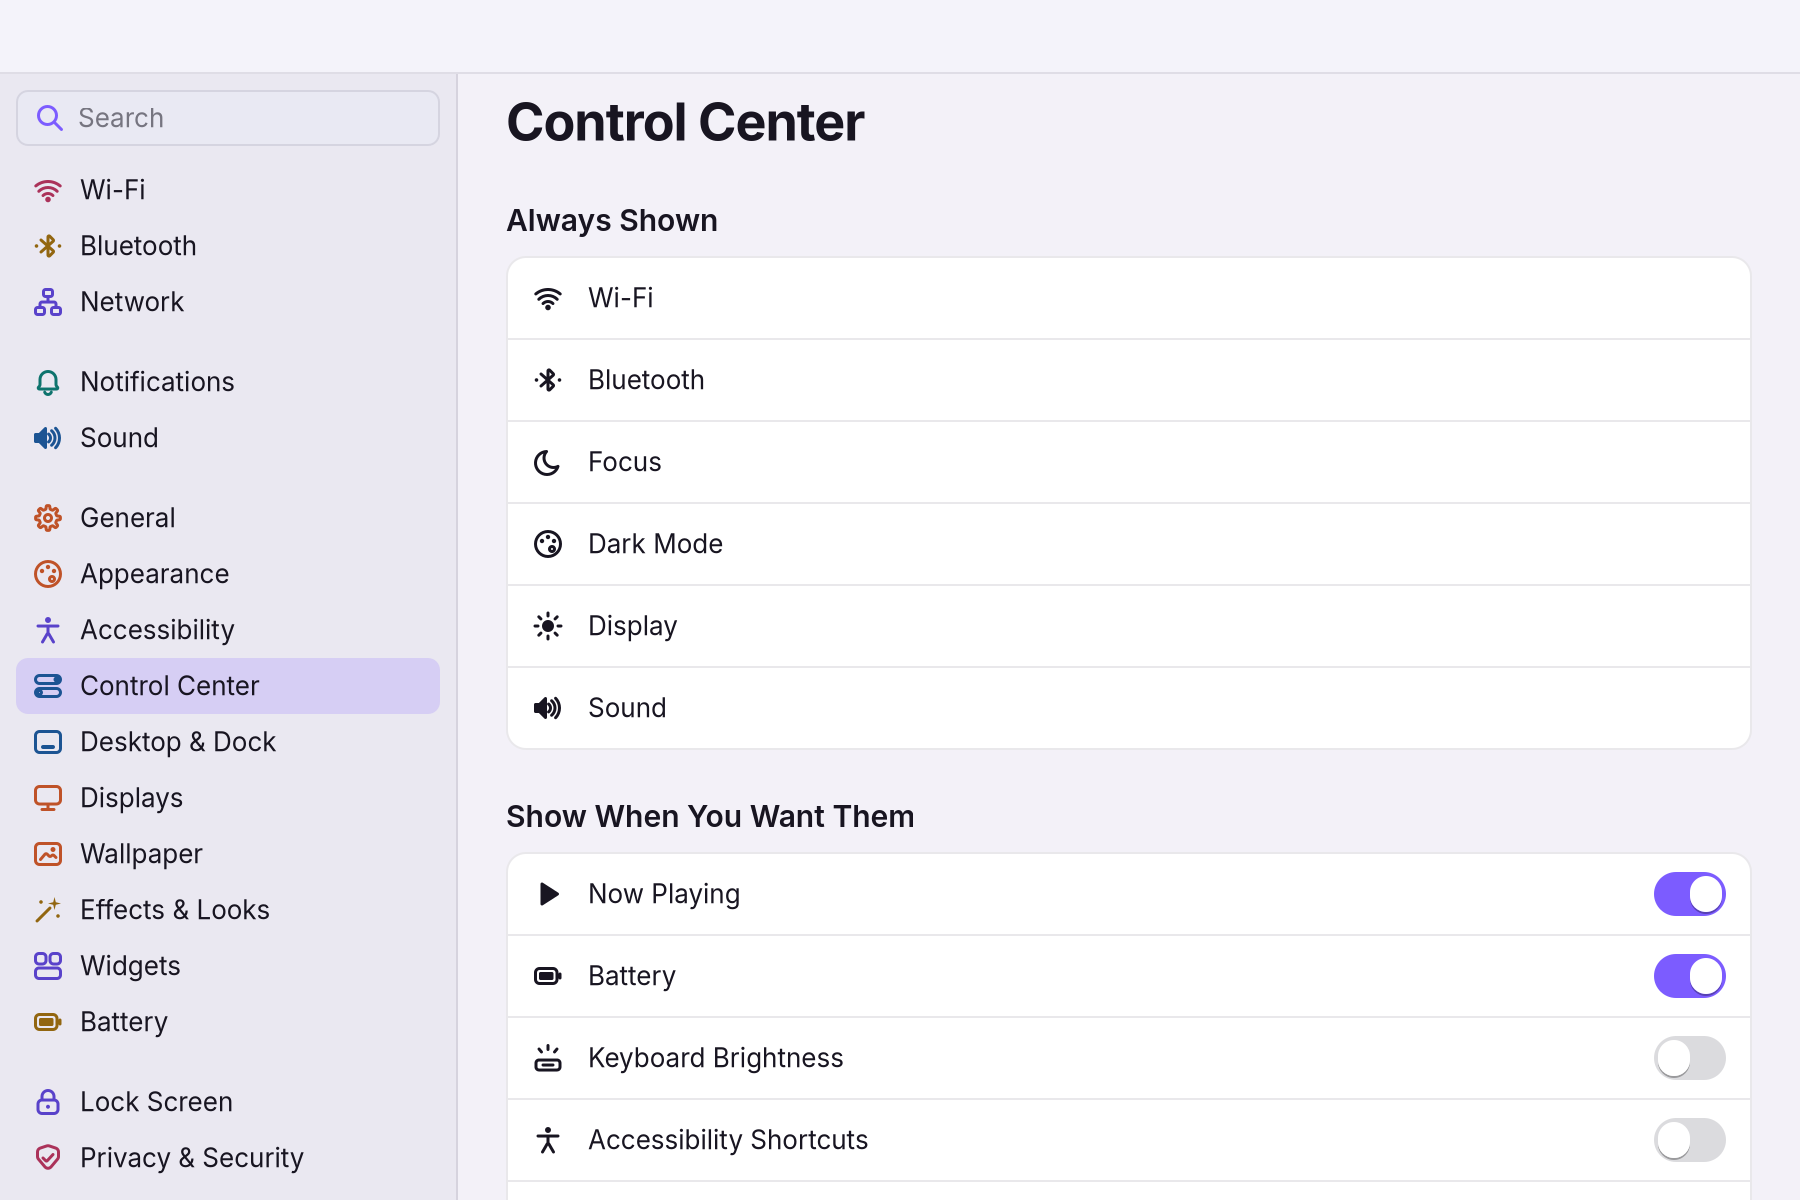
System Settings > Control Center. Always Shown lists Wi-Fi, Bluetooth, Focus, Dark Mode, Display and Sound. Under it, each other part has a switch: Now Playing, Battery, Keyboard Brightness, Accessibility Shortcuts and the rest.
A small add-on for the desktop: a menu bar item, a widget, a search result or a theme. It runs in a sandbox. can add tiles of their own. A plugin tile that runs something does so only after you allowed it; see Plugins.
The same switches on the keyboard
| Keys | What they do |
|---|---|
| Ctrl+Super+N | Warmer screen colours in the evening, easier on the eyes at night. on or off |
| Ctrl+Super+D | Do Not Disturb on or off |
| Ctrl+Super+I | A switch that keeps the computer from sleeping or dimming the screen, for a presentation or a long download. on or off |
| Shift+Super+5 | The screenshot toolbar, the same as the Screenshot tile |
| The volume and brightness keys | The same as the sliders; a sign in the middle of the screen shows the new level |
A worked example
Alice arrives at a café. She clicks Control Center, clicks Wi-Fi, picks "Café Hatter", types the password from the menu card and clicks Join. She plugs in her headphones, clicks the arrow at the end of the Sound slider and ticks them. Then she clicks Focus > Do Not Disturb > For 1 hour, so nothing interrupts her while she writes. When she leaves, the hour has passed and banners show again on their own.
If something goes wrong
| What you see | What to do |
|---|---|
| "No networks found" | Wi-Fi is off or no network is in range. Click the Wi-Fi icon to turn it on, move closer, or use Other Network… for a hidden name. |
| "“…” didn’t accept that password." | Check the password, including capitals, and type it again. |
| "Bluetooth is unavailable" | This computer has no Bluetooth, or it is switched off in the computer's own settings. A small USB Bluetooth adapter adds it. |
| "No paired devices" | Nothing was paired yet. Put the device in pairing mode and open System Settings > Bluetooth. |
| "No other display" on Screen Mirroring | Only one screen is connected. Connect the second one, then try again. |
| A slider moves but nothing changes | The device does not let the computer change it (some external screens set their own brightness). Use the buttons on the device. |
| No sound from the headphones | Open the Sound page (8) and tick them under Output. See Sound. |
| A tile you want is missing | Turn it on in System Settings > Control Center. |
Related
- System SettingsThe one window for everything you can change: how to open it, find any setting by typing, what every pane holds, and how to take a change back.
- The desktopThe menu bar, the Dock, windows, Search, switching apps and the four desktops: what each part of the screen is for and how to use it.
- NotificationsBanners at the top right, Notification Center for what you missed, Do Not Disturb and Focus for quiet, and what stays visible even then.
- Playing full screenWhat WolOS does while a game fills the screen: banners wait, frames go out at once, the refresh rate follows the game, and Force Quit still opens.
- Your first daySign in for the first time, finish the setup, and spend ten minutes making WolOS yours: Wi-Fi, updates, looks and your first apps.